Friday, 22 March 2013
Wednesday, 20 March 2013
Monday, 11 March 2013
Evaluation 2: How did you use media technologies in the construction and research, planning and evaluation stages?
The script that I wrote for this can be seen below:
Tuesday, 5 March 2013
Evaluation 1: What have you learnt from your audience feedback?
To gain audience feedback I decided to use an internet based questionnaire (http://www.surveymonkey.com/s/6Q5M28P) over a paper based questionnaire as it allowed me to embed it onto social networking sites to gain more responses. I am also able to analyse the results more efficiently using the percentages and statistics that are shown after each question. I have gained 8 responses, although this is not a large sample, and will not be representative of our target audience, the results are still going to be useful.
Question 1

My first question was to find out which gender the person completing the questionnaire was. It shows who was attracted to the music video and in our audience research at the start, we concluded our target audience was both males and females and this is shown within this questionnaire. There was an equal number of responses, 4 male and 4 female.
 My next question was asking the respondents for their age. This question was important because from our audience research, we concluded that our target audience was between the ages of 16 - 29. With the results from this question we are able to see whether our music video is attracting the correct target audience and we are able to see what they think of our music video. The responses we gained from this were that 7/8 of our respondents were between the ages of 16-19 and 1 was between 20-24. This is what we aimed to find as our music video was aimed at that age group, it is also helpful when analysing the rest of the results as the responses are from those who are within our target audience.
 I asked this question to see wether our target audience were able to correctly identify the genre if the music video that we created. In this questionnaire, the respondents answered 'Electronic' which is the correct genre but this is seen differently in the focus group that I held. Participants thought it could have been from the rock or alternative genre. From the results in this questionnaire it is clear that we have successfully stuck to the genre conventions of the Electronic genre.
 The next question in my questionnaire asked 'did you enjoy the music video along with a reason for your answer.' This will give me an insight into who and who didn't enjoy the music video and why or what aspects they did/didn't like. Every respondent answered 'yes' to this answer which means that they did enjoy the music video. Overall positive comments that came from this were that it followed a strong clear narrative, the storyline matched the song and that the editing was effective. This suggests that the music video that we created was successful as our target audience especially enjoyed the video and could comment on the positives of the music video.
 The fact that many people are commenting the same indicates that we have done that part really well. Our aim was to make the narritave clear and go along with the song but at the same time, have the performance part happening at the same time. These comments indicate that we have managed to do this successfully.


 Some points that they picked up on were that it is 'clear' and that 'it suits the style of music' that my music video is along with it fitting with the colour scheme of my other products/ This is a positive comment as that was my aim for this digi pack, that it matches the genre of my music video and also matches with the other products I have made.

From this focus group the general feedback was positive and that I had created synergy between all of my media products and links could clearly be drawn, this could be through the colours along with the style of editing. It was fed back to me that they liked the editing and 'it was different.' When I asked them to elaborate they liked the part where the old tv effect appeared in the part of the song where it sounded fuzzy. They said that it gave it a good eddect and the song flowed rather than it jumping, starting and stopping. Overall the feedback from this focus group was positive, although the participants were shy and didn't talk as much as I would have liked, they gave me valid answers which have helped with my audience feedback.
Lastly, I used youtube statistics and analytics to gain feedback from my music video. I looked at the amount of views my youtube video gained within the last 30 days which was 218. This shows many people watched my music video but it is not reliable as it could be the same person watching it over and over again. With this I went in depth and looked primarily at the top demographics. From looking at these I found that females from 13-24 watched my music video the most along with males aged 18-24. This suggests to me that my video has attracted my intended target audience of 16-29 both males and females.


Question 1

My first question was to find out which gender the person completing the questionnaire was. It shows who was attracted to the music video and in our audience research at the start, we concluded our target audience was both males and females and this is shown within this questionnaire. There was an equal number of responses, 4 male and 4 female.
Question 2
 My next question was asking the respondents for their age. This question was important because from our audience research, we concluded that our target audience was between the ages of 16 - 29. With the results from this question we are able to see whether our music video is attracting the correct target audience and we are able to see what they think of our music video. The responses we gained from this were that 7/8 of our respondents were between the ages of 16-19 and 1 was between 20-24. This is what we aimed to find as our music video was aimed at that age group, it is also helpful when analysing the rest of the results as the responses are from those who are within our target audience.
Question 3
 I asked this question to see wether our target audience were able to correctly identify the genre if the music video that we created. In this questionnaire, the respondents answered 'Electronic' which is the correct genre but this is seen differently in the focus group that I held. Participants thought it could have been from the rock or alternative genre. From the results in this questionnaire it is clear that we have successfully stuck to the genre conventions of the Electronic genre.
Question 4
 The next question in my questionnaire asked 'did you enjoy the music video along with a reason for your answer.' This will give me an insight into who and who didn't enjoy the music video and why or what aspects they did/didn't like. Every respondent answered 'yes' to this answer which means that they did enjoy the music video. Overall positive comments that came from this were that it followed a strong clear narrative, the storyline matched the song and that the editing was effective. This suggests that the music video that we created was successful as our target audience especially enjoyed the video and could comment on the positives of the music video.
  The fact that many people are commenting the same indicates that we have done that part really well. Our aim was to make the narritave clear and go along with the song but at the same time, have the performance part happening at the same time. These comments indicate that we have managed to do this successfully.
Question 5

I wanted to find out how well I had created my digi pack and whether it was appealing to others so I asked the question 'is the digi pack appealing to you?' Out of the 8 respondents they all said that they found me digi pack appealing. This is a good thing as the target audience need to find it appealing in order for them to buy it, therefore I feel that I have successfully attracted my target audience.
 Some points that they picked up on were that it is 'clear' and that 'it suits the style of music' that my music video is along with it fitting with the colour scheme of my other products/ This is a positive comment as that was my aim for this digi pack, that it matches the genre of my music video and also matches with the other products I have made.
Question 6
 This question was asked to see if I had created my website in a way which is appealing to my target audience. 8 out of the 8 people I asked answered 'yes' which suggests that they were happy with my website and they found it appealing. I gained only 7 comments to this question but they were in a lot of detail. A comment said that they were 'able to see exactly who the artist is...' and that 'the website conveyed well to the genre of the music that was created through use of colour and font.'

There was another 2 comments which suggested the same, that it fits with the other products, these are positive comments as they feels that the website I created matches well with the genre and other products, this is positive because my aim was to make products which are all synergistic with each other. Other comments were that it looks professional, tidy, and interactive.

Question 7


There was another 2 comments which suggested the same, that it fits with the other products, these are positive comments as they feels that the website I created matches well with the genre and other products, this is positive because my aim was to make products which are all synergistic with each other. Other comments were that it looks professional, tidy, and interactive.
Question 7

The next question I asked was to find out whether the respondents felt that all three of my products (music video, digi pack & website) were synergistic with each other. All 8 of the respondents replied 'yes' to this question suggesting that I have successfully made three media products that are linked with each other and people can tell that they are from the same artist. Some things that they picked up on that were synergistic were the use of the colours, the editing and the same artist.

Question 8
 The last question I asked was for an overall rating of the music video. The average rating was 8.75 because 1 respondent rated it 7 out of 10, 2 responded 8/10, 3 responded 9/10 and 2 responded 10/10.
Overall this gave me an indication that my target audience enjoyed my music video but there are a couple of things that need to be improved in order to gain 10/10.
Secondly, I used a focus group to gain feedback from my target audience, I used 3 girls and 1 boy ages 18-19. The focus group I carried out is embedded below.
Question 8

Overall this gave me an indication that my target audience enjoyed my music video but there are a couple of things that need to be improved in order to gain 10/10.
From this focus group the general feedback was positive and that I had created synergy between all of my media products and links could clearly be drawn, this could be through the colours along with the style of editing. It was fed back to me that they liked the editing and 'it was different.' When I asked them to elaborate they liked the part where the old tv effect appeared in the part of the song where it sounded fuzzy. They said that it gave it a good eddect and the song flowed rather than it jumping, starting and stopping. Overall the feedback from this focus group was positive, although the participants were shy and didn't talk as much as I would have liked, they gave me valid answers which have helped with my audience feedback.
Lastly, I used youtube statistics and analytics to gain feedback from my music video. I looked at the amount of views my youtube video gained within the last 30 days which was 218. This shows many people watched my music video but it is not reliable as it could be the same person watching it over and over again. With this I went in depth and looked primarily at the top demographics. From looking at these I found that females from 13-24 watched my music video the most along with males aged 18-24. This suggests to me that my video has attracted my intended target audience of 16-29 both males and females.
From all of my audience feedback I have learnt that my products are all synergistic and people can clearly tell my products all link together. I could improve my feedback by having more people take part in my survey along with different ages of people taking part. This would allow me to analyse more reliable and valid feedback and I would be able to clearly tell the differences between the age groups that watch the video etc.
Friday, 15 February 2013


Thursday, 14 February 2013
Digipack editing
I have edited 4 photos which I want to use for my digipack using an online photo editing service 'picmonkey.' I firstly chose the four images I wanted to use for my digipack then uploaded them to pic monkey.
 I firstly used the 'Orton Process' and turned up the Bloom to 100%. This made the image look different but I felt that it still needed editing so I tried to find another edit which would make it look better.
Throughout our music video we have used a blue edit, because of this I decided to use the blue edit within cross process which would add a tint of blue to the images. Because I didn't want to have a whole blue image and I wanted it to be quite subtle I changed the fade to 37%.
Another effect that I thought looked good was the Tranquil effect, I changed this to 17% and felt that the colour of the image now looked good enough to use on my digi pack and it was synergistic with my music video.

Here are the photos before and after.
Before After


Wednesday, 13 February 2013
Adding identity using livetype
Above is a video by myself and Daniel about how we made and imported the identity credits for our music video. We felt that having these credits at the beginning and at the end of the music video gave the video a more professional feel as these credits can be seen in professional music videos that are seen on the TV.
Wednesday, 6 February 2013
Editing 6/02/2013
 |
| Actor to the right of the screen. |
 |
| Actor to the left of the screen. |
I decided that I wanted to try and change this making it less obvious so I used the 'Flop' effect within the perspective effects folder to flip the clip which made the actor stand on the right side.


This has now overcome two issues but there is yet another issue I noticed. In the first clip the actor has a prop in his hand and when it changes to the next shot, the prop is not there. This is another continuety error which I need to over come. I could accept this error or try to add another shot between the two clips which would in theory give the actor a chance to move the prop between hands. I added in a shot of the audience to break up these two shots and it seemed to work.
Tuesday, 5 February 2013
Copyright
To ensure that nothing I have used within my Digi pack is copyrighted I took my own photos and edited them myself. Along with this I made my own bar code to put on my digipack through 'http://www.barcoding.com/upc/.'This website allowed me to put in my own bar code number making it unique to me and to outweigh the issue of copyright. Below is what my bar code looks like.

Wednesday, 30 January 2013
Peer Assessment- SMART Target
In discussion with the rest of our group me and Daniel were given feedback on the current progress of our music video. We were given feedback in regards to a SMART Target.
Specific- Part of the footage, part of video to be improved
Measurable- Can tell when it has been completed
Achievable- Making sure each advice/adjustment is achievable with the recourses and time limit avliable
Realistic- Not filming new footage, no explosions etc
Time bound- Can the targets be done within the time limit given (1hour lesson)
We were given some targets from our music video in its current state:
1) For certain clips used rather than placing the clips on the brat of the soundtrack, change this and place them on the syllables of the lyrics as it works better with the sound along with the footage. For example, when we cut between the two shots of 'Joe' in the audience, make the cuts on the syllables of the words instead of between the beat as it looks too jumpy and runs too fast.
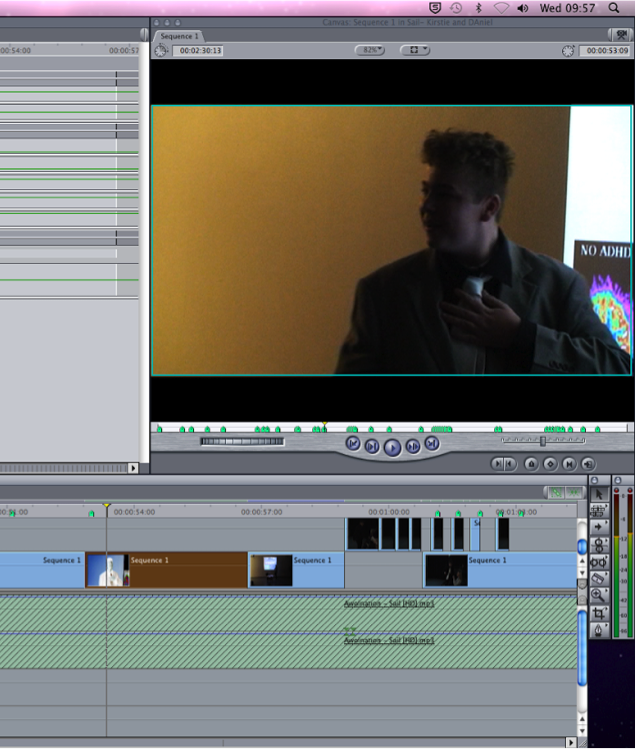
We changed this element within our music video. As you can see below, we used markers at points where the syllables fell and put the clips in time with the markers.

2) With the effects that we have already used within the music video try and only keep them on specific memorable parts of the song such as the chorus so the effect looks more effective and stands our more rather than within the whole music video.
3) Not to use over the top effects, and over use the same effect, keep them on particular sections. An example of this is the blue filter used in the 'sail' clips
Specific- Part of the footage, part of video to be improved
Measurable- Can tell when it has been completed
Achievable- Making sure each advice/adjustment is achievable with the recourses and time limit avliable
Realistic- Not filming new footage, no explosions etc
Time bound- Can the targets be done within the time limit given (1hour lesson)
We were given some targets from our music video in its current state:
1) For certain clips used rather than placing the clips on the brat of the soundtrack, change this and place them on the syllables of the lyrics as it works better with the sound along with the footage. For example, when we cut between the two shots of 'Joe' in the audience, make the cuts on the syllables of the words instead of between the beat as it looks too jumpy and runs too fast.
We changed this element within our music video. As you can see below, we used markers at points where the syllables fell and put the clips in time with the markers.

2) With the effects that we have already used within the music video try and only keep them on specific memorable parts of the song such as the chorus so the effect looks more effective and stands our more rather than within the whole music video.
3) Not to use over the top effects, and over use the same effect, keep them on particular sections. An example of this is the blue filter used in the 'sail' clips
Wednesday, 23 January 2013
Editing (23/01/2013)
During today's editing session I was decided to edit a piece of footage which looked very easy on the eye and where only part of the footage was needed. To improve this clip and make it more effective I used 'image+wireframe' which when clicked appeared with a cross through the screen, allowing me to move the clip. My aim was to use the same clip showing three times on the screen. I needed to crop the footage from top and bottom to show on the screen the intended arm movement. I then put the same clip again in the second video track using the same crop dimensions and shortened the clip so it came in after the first one. I did this again with the third copy of this clip, putting it in the 3rd video track.


I moved them on the screen using the image frame making sure they were inline with each-other and had an equal distance between them. When it played through, the clips appeared when it fell on the beat which looked really effective.

Editing Progression
Yesterday (22/01/2013) myself and Daniel continued with editing our music video we had the first 30 seconds sorted with the music but within this there were some minor issues we had. We had a 'gap' of no footage at around 0.17 seconds which also fell with the first major beat in the music. Both me and Daniel knew that we couldn't leave this gap empty with just a blackout, first of all we tried to use a transition of fade to white to give the 'gap' some effect but we felt that it was too much of an important beat not to put footage on. We kept watching over the introduction we had and then realised that the clips we used, the lighting was off and we had previously used footage to show lights going on, therefore we moved the clip of the lights going off and added them into the gap. After watching this, we made the light turn off on the beat of the music and it looked much better rather than filling it in with an effect.


We decided that the two column storyboard that we created in our planning wasn't a good piece of documentation when creating the music video. The document was good whilst we was filming as we gave it to the actors and they were able to follow what we was filming and the shots we needed but we are now aware that during editing is has become less useful. It is apparent to us that we overestimated the amount of time we had for each section of the song and the clips we can put in. For example, the instrumental at the beginning is 18 seconds long and we suggested to put in only a couple of clips but now during editing, that time is too long for only a couple of clips so we have moved everything along, now we are unable to follow the storyboard for specific shots and times.


There were two shots that we were using which when we recorded were not 100% thought about, this was the shot of joe (our actor) unclipping the bag on the table and when he slammed his hands on the table. In order to put these shots next to each other which is what we intended to do within the video, we couldn't because a jump cut was created. Joe's hands in the clip of him opening the bag were still in shot and when we put the clip of him slamming his hands on the desk, the hands jumped to a different position which created a jump cut. Because we couldn't go out and film this again, we tried different things to overcome this, firstly we just left a gap and decided it didn't work effectivly. We then looked through all if the footage taken and decided to add in a clip of the audience members in the lecture. Firstly this clip was really short and it jumped through the 3 clips really quickly, we cut down the beginning of the last clip (hands on the desk) and made the audience clip longer which then overcome the jump cut.
 |
| Hands in the footage at the end of the shot. |
 |
| Hands changing position at the start of the next shot. |
 |
| We left a gap within the two shots which didn't work effectively. |
 |
| Added a clip of the audience over the top and it looked good. |
Wednesday, 9 January 2013
Initial Editing Problems
Today we started editing our music video, since putting in the first couple of clips we have come across a couple of issues. The main issue is the order of shots and the jump cuts between the different shots we have use. This means that the video comes across 'jumpy' and doesn't run smoothly, to overcome this we have placed another shot between the two. We had two shots of different people walking in the doors, when we put them together to make them run next to each other, it was clear that the positioning of the camera had changed and therefore a jump cut was visible. We put a shot of the lights turning on to take the obvious cut away, this was the best possible solution which makes the footage run smoothly. Before we added the shot of the lights turning on in we did try to use a transition but this didn't go with the music or look right.


The brightness does change and it makes the clip brighter, you can see the actors face and costume, but rather than just sections of the footage it brightens the whole clip up. This doesn't make the clip look good as it doesn't look natural, me and daniel have decided that using the brightness in the way doesn't look effective and are aiming for find another solution to make the clips look better.

Another issue that we have come across today is with the lighting of the clips. When we was filming, through the camera the lighting of the footage looked fine, now we have put it into final cut and have started editing, the lighting is not how we expected. Some of the shots have come out really dark and possibly too dark to use in the music video. We tried to adjust the brightness of the clips to see if this would change and brighten up the shots, below is a before and after shot of the brightness change.


The brightness does change and it makes the clip brighter, you can see the actors face and costume, but rather than just sections of the footage it brightens the whole clip up. This doesn't make the clip look good as it doesn't look natural, me and daniel have decided that using the brightness in the way doesn't look effective and are aiming for find another solution to make the clips look better.
Tuesday, 8 January 2013
Update
First lesson back from half term and we have discussed where we have got up to with our music video. As all of our footage has been filmed we are now ready to start editing. Our group decided to split into pairs to make two separate versions of our music video with the same set of footage. This would let each of us have an equal chance to edit rather than sharing the editing process between 4 people. Me and Daniel decided to work together and Becky and Stevie are working together.
We are going to start editing once our footage has been uploaded from the camera this lesson. We have already checked that all our footage had been captured before we go ahead and upload it, without this we would just have to edit the parts we have even if they are incorrect rather than going out and wasting editing time to re-film different aspects.
During the editing process me and Daniel aim to keep as close to the conventions of the electronic genre as possible, using as much genre research we carried out to help us meet this. Along with this we are aiming to keep synergy throughout the music video and the other platforms (webpage and digipack).
Subscribe to:
Posts (Atom)